How to Set Up UTM Tracking for Your Campaigns
![]()
Digital Marketers like us know that data is the main source of assurance that our campaigns are helping businesses take off in the digital space. Enter UTM tracking. With just a few simple steps, you can now have a measurement of the impact that your campaign is driving to your site. I am aware that driving traffic to your client’s site can be effectively measured by the standard tracking tools but you should also know that having a dedicated time to set up UTM tracking will make your campaigns more effective in return.
It’s easy to say that the site is raking in traffic but I suggest that you go ahead and set up a UTM tracking because it would be easier to defend the boost in online growth when you know where it’s coming from. You can rely on numbers to state the impact that your campaign is providing for the business but it is not a good enough basis on the user behavior and effectiveness of your content.
Here, we will illustrate the implementation of UTM for your campaigns. Read more about it below.
What is UTM?
UTM stands for Urchin Tracking Parameters. It was introduced by Google back when the web analytics software of the same name (Urchin Analytics), was on full swing. UTM is designed to track user behavior of site visitors but having custom tracking would make it a much more in-depth tool. The text strings found in the code will allow you to track URLs that are usually clicked on. This will help you pull up data from Google Analytics on what types of campaigns work out perfectly for you.
UTM Paramaters that You Should Know About
Creating a UTM tracking would require you to be knowledgeable about its elements specifically the parameters for each campaign. If you are unfamiliar with this, then this is your quick guide to the parameters that you would need to understand in order to ensure that you will have a successful tracking campaign.
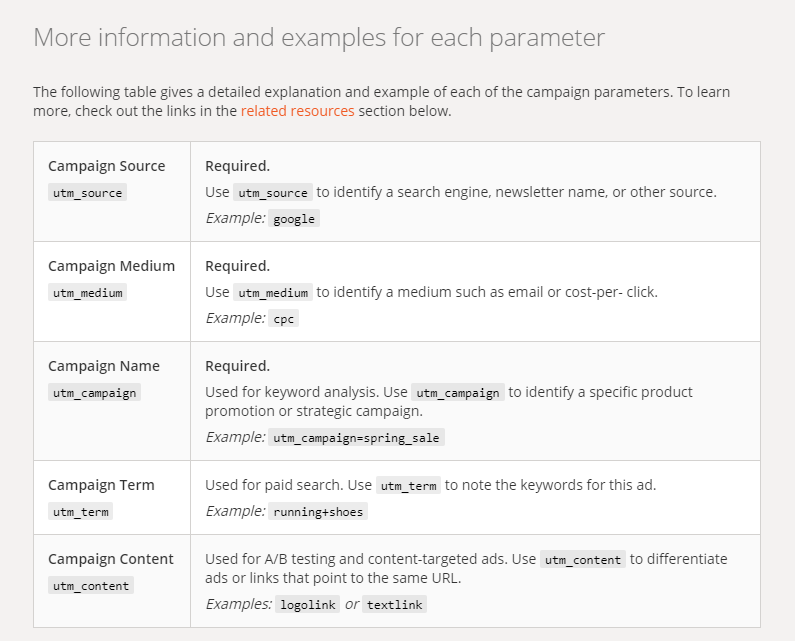
Campaign Source
Simply put, this is where your traffic will come from. Adding this parameter to your links will ensure you where you are deriving visitors from. This way, you would know which type of source would work best for your campaign. Whether it is a LinkedIn page or Google, this will help you determine what type of source is most powerful and therefore helping you to see where else you can improve in.
Campaign Medium
The parameter pertaining to the medium is all about how the traffic goes into your site. Do you have a more organic approach as opposed to a paid campaign? Then, you would know what type of campaign you should start with your business. This also covers the medium of email or cost-per-click. If you are tracking social traffic, then it would be best to tag your medium for the most general term for it. Emails, blogs, or guest posts are also included in this parameter.
Campaign Name
The campaign name is technically a placeholder parameter but an integral part of your campaign tracking since this will help you identify which campaign you are measuring for this particular UTM. It would be best to name it for the specific campaign or product you would want to promote. According to Google, it is used for keyword analysis so it would be the best thing to make this as optimized as possible so you are well on your way to creating a clear and concise UTM.
Campaign Term
Campaign Term is an optional field in the campaign builder because you would only use this for paid search. This is important for those who are in the field of Search Engine Marketing and the like. Use the campaign term option to inject the keyword that you would want to be part of the UTM. If you are targeting a specific keyword, then check if it is a term that would drive better ROI for your site.
Campaign Content
When your campaign is generating enough traffic or not enough of it, the first step you can take is to perform an A/B test. This is where the campaign content field is most useful. This parameter tag can be used for your ads, a different version of the website, or even a specific demographic that you would want to target. Like the campaign term, it is also optional so check first if you are going to fill out this field.
Starting Your UTM Tracking
To start your UTM tracking, you must first follow the steps found here. I find it pretty easy thanks to Google’s Campaign Builder. Although, I can do it manually, it is more efficient to delegate this task to this software since it gives you the UTM code in a snap.
Step 1
If you haven’t created a custom report in Google Analytics for the particular campaign, you should begin with this. You can find this on the sidebar of Analytics, on the Customization tab. Click on the dropdown and select Custom Reports. From there, you will see the Custom Report Dashboard. Click on +Create a New Form.
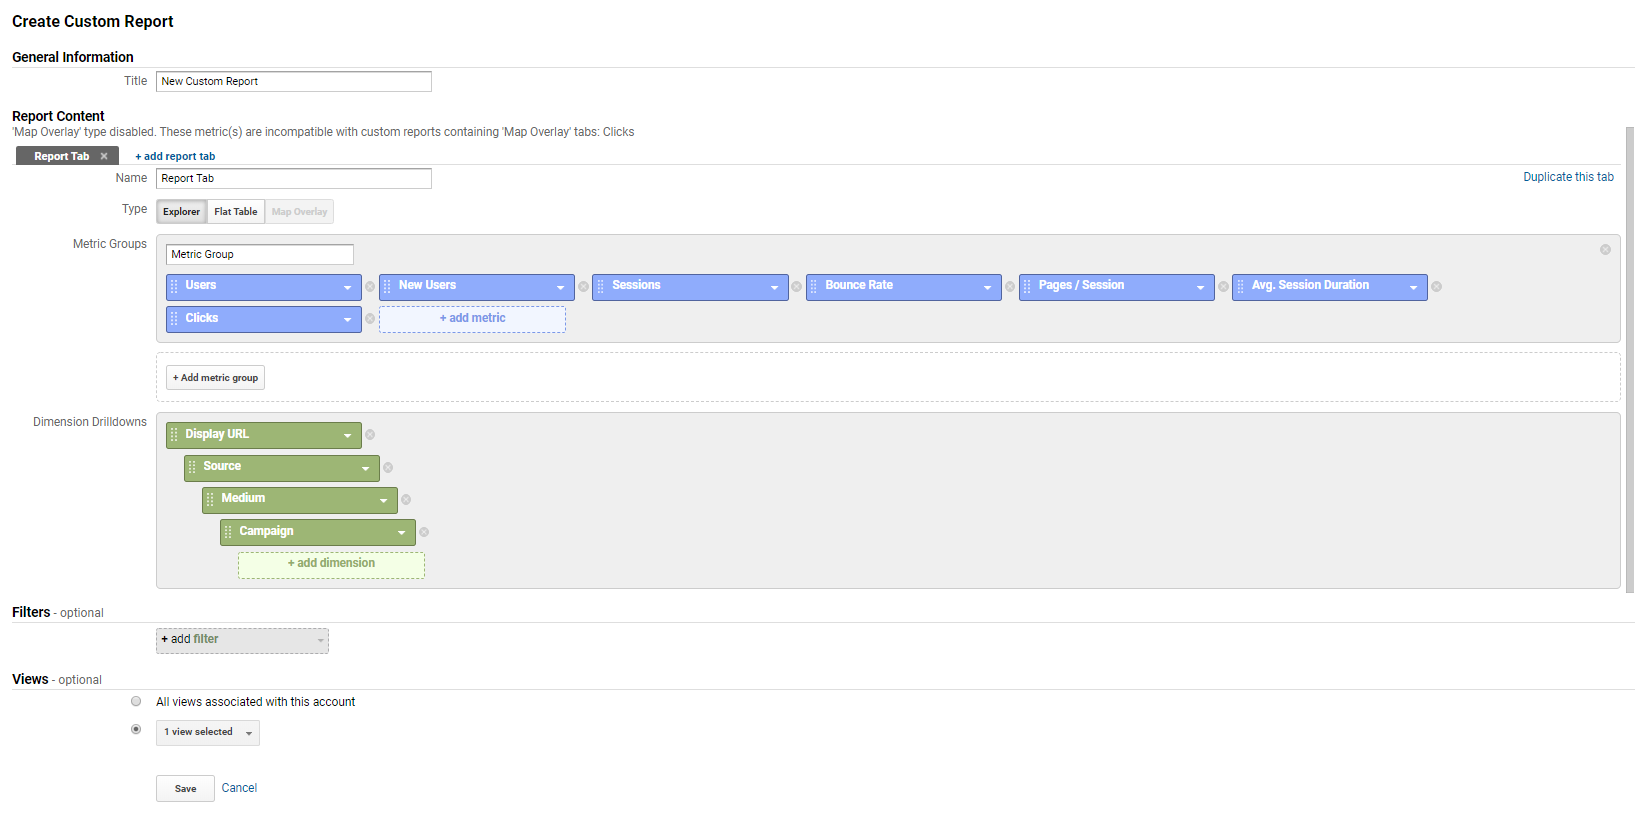
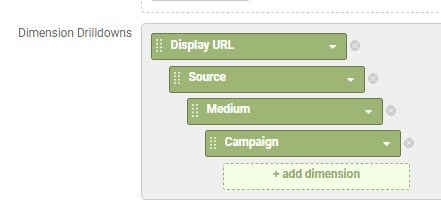
Create a custom report by providing a name, the metrics that you would want to analyze, as well as the Dimension Drilldowns that you would help you track how the campaign went about from the user’s perspective. Creating a custom report is optional and you can opt not to do it but for a more organized tracking, the custom report would help you achieve your campaign goals.
Step 2
Next, open the Campaign URL Builder by clicking here. Once you landed on the page, you would be asked to input the required details that would allow you to add the campaign parameters you need. The UTM would be automatically generated for you and all you need to do is to use it for your campaign.
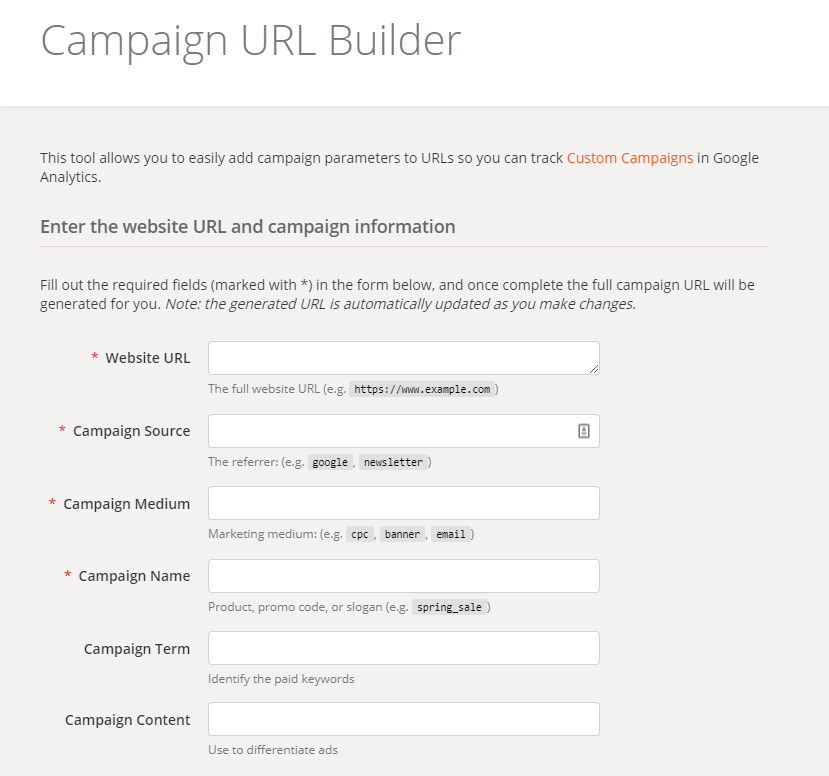
As I mentioned earlier, there are parameters that you should follow. Go ahead and fill it out now. Your UTM would look like this:

Step 3
Once you have created your own custom UTM, then you can now use it for your ads or Call-to-Action sections of your content. Once you do this, you only need to wait for the data to be pulled from the visitors you garnered based on the metrics you have introduced for UTM. It will automatically generate data for you.
Step 4
Measure your success by looking at your Google Analytics. Go to Acquisition > Campaigns > All Campaigns. Depending on the metrics you chose, you would be able to see how effective your campaigns are. You can measure the impact of UTM tracking by seeing how many users went into the campaign. For additional metrics, you can also enable conversions and it would help if you have multiple goals to track.
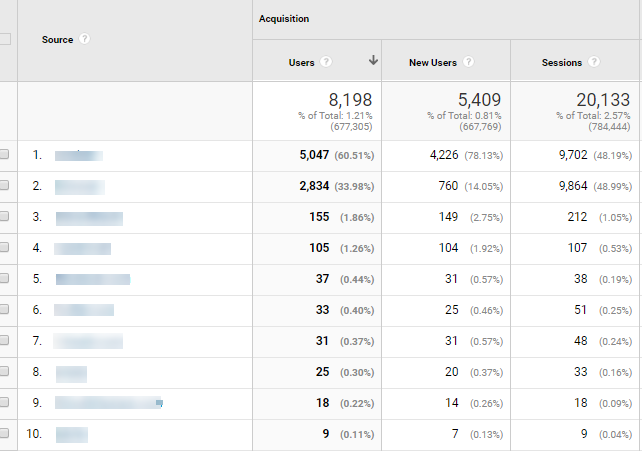
For an in-depth measurement of UTM campaign success, also look at the sources that helped in generating traffic for your campaign. This way, you can train your efforts for the specific channel that is giving you high traffic or low traffic, depending on your priority.
Knowing the sources of traffic in a more in-depth way would help you justify that your digital marketing process is a foolproof plan. Keep this in mind as you start your campaign tracking with UTM.
Key Takeaway
The main benefit of having UTM code is that you can test the effectiveness of your marketing campaign. Shifting your focus to those who are underperforming would be easier since you can clearly see the data that would be presented to you. As for SEO, you can use this to predict and evaluate user behavior on your site or campaign. See what types of content are useful and effective for your audience and maximize that to your favor.